photo botslide.jpg

food crush

Thursday, April 20, 2017


 Believe it or not, living on the coast of California doesn't always mean having access to the freshest of local seafood, especially when buying shrimp. It's not rare to find your only options to be foreign and farm raised. (Yikes!) So imagine my surprise when I came across these wild and local beauties at my fav Santa Monica's farmers market! 
I chose to marry them with a garlic confit chimichurri, which by the way, can have endless options. Though my Thai roots were calling, so I included fresh lemon grass and bird's eye chili's (thai peppers) in this quick and tasty recipe. 
Wild prawns with Garlic Confit and "Thai" Chimichurri 


*serves two

INGREDIENTS:


1 pound wild prawns (if yours are frozen, thaw them under cool running water just before use)

1 head of garlic, cloves separated and peeled

1/3 cup olive or grape seed oil

2 large lemongrass stalks (pale parts only), chopped coarse

2 bird’s eye chili peppers ( or you can use serrano or jalapeño),  seeds discarded

1 cup fresh cilantro 

1/4 cup fresh oregano

1 shallot, chopped coarse

1/4 cup red wine vinegar

1 teaspoon smoked paprika

1 teaspoon salt

1/2 teaspoon pepper

1 cup water

extra fresh herbs like cilantro or chives(the micro versions are even better, if you can find them)for garnish


Note: Prawns pictured in the photo are what was available to me at the time and not as big as I prefer; the bigger, the better for this recipe!


PREPARATION:


 1) Place garlic cloves  and oil in a small saucepan, and bring to a gentle simmer over medium low heat. Cook garlic, stirring occasionally until golden and soft, about 15 minutes.

 2) Transfer garlic and oil to a food processor and pulse with the lemongrass, chili’s, cilantro, oregano, shallot, red wine vinegar, smoked paprika, salt, and pepper.

 3) Place 1 cup of water and prawns in a medium pot, and  pour your chimichurri sauce over prawns. Cover pot and bring to a boil. Boil prawns until cooked through, about 5-8 minutes. Taste the sauce, and add more salt -n- pepper if needed. Transfer to a large
  shallow bowl or platter and serve with some crusty 
grilled bread! 


food crush

Friday, February 10, 2017


Chili "pot all night!"


serves 4-6

INGREDIENTS:

1 medium onion, chopped fine

1/2 bell pepper, chopped fine

1-2 cloves garlic, chopped fine

1-2 tablespoons olive oil

2 tablespoons softened butter & 2 tablespoons masa flour (mixed together and made into a "paste")

1 pound grass-fed ground beef

2 cups chicken stock

2 cups puréed tomatoes, fresh or canned

1 tablespoon chili powder

1 & 1/2  tablespoons ground cumin

few pinches ground cayenne pepper

15 ounce can black beans, drained and rinsed

15 ounce can pinto beans, drained and rinsed

salt & pepper to taste

ADDTIONAL TOPPINGS:

shredded Colby or Monterey Jack cheese (duh!)

fresh chopped cilantro

sour cream

sliced avocados

soup crackers or fried tortilla strips

PREPARATION:

1) Heat olive oil in a medium to large pot over medium high heat. Add onions, bell pepper, and a little salt & pepper, stirring occasionally until softened, about five minutes. Stir in garlic and cook for another 30 seconds, until its nice and fragrant.  Coat vegetables with your butter and masa flour paste. Then add ground beef, more salt and pepper to taste,and brown the meat until no pink remains.

2) Pour in the chicken broth and tomatoes, scraping up any brown bits in the pan. Now add the spices and the beans, and again salt and pepper to taste. Bring to a boil.

3) Reduce the heat to low, cover pot, and simmer for about 15-30 minutes. Serve in individual bowls, and top with your favorite accompaniments!

fried tortilla strips (yum!)


INGREDIENTS:

1/2 cup cooking oil

6 small tortillas, cut into 1/4 inch strips

salt to taste

PREPARATION:

Heat cooking oil in a shallow pan over medium high heat. When oil is hot and shimmering, add tortilla strips in a single layer. Fry until both sides are nice and brown. This takes about a minute. Drain on a paper towel lined plate, and salt to taste. Repeat if necessary.


food crush

Friday, February 3, 2017

Now that you've made your own stock, It's time to share the love by adding it to some of your own rotating faves, like this.... 💛-Jess xoxo
J
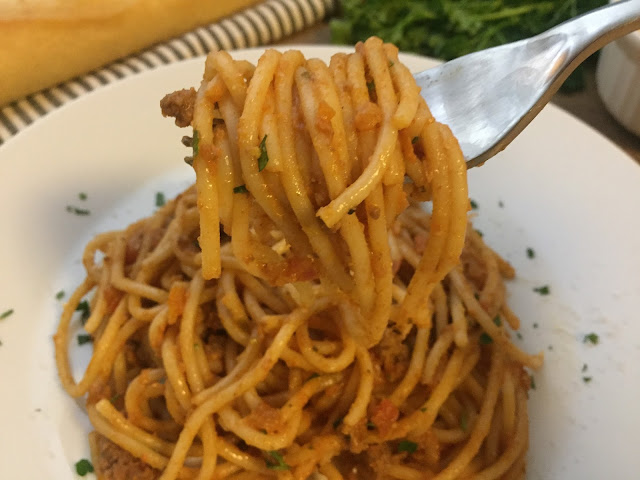
Spaghetti & Meat Sauce


serves 4-6

INGREDIENTS:

1-2 tablespoons olive oil

1 medium onion, largely chopped

2 carrots, peeled & largely chopped

1 celery stalk, largely chopped

1 pound grass-fed ground beef

24 ounce jar of your favorite marinara sauce (I happened to use a creamy tomato basil sauce here)

1/2 cup chicken stock

1/2 cup reserved pasta water

3/4 pound spaghetti

salt and pepper to taste

grated pecorino romano cheese and chopped fresh parsley for serving


PREPARATION:

1) Bring 3-4 quarts water to a boil in a large stock pot. Cook spaghetti according to package directions. Before draining, remember to reserve 1/2 cup of the pasta water.

2) Prepare the base for your pasta sauce by making a mirepoix by chopping onions, carrots, and celery in a food processor until you get a fine chop or mince, depending on your preference. 


Mirepoix (Pronounced: meer-PWAH)


3)Heat 1-2 tablespoons olive oil in a large skillet over medium high heat. Add mirepoix, season with a little salt and pepper, and cook until vegetables have softened, about five minutes. Mix in the ground beef, season with more salt and pepper, and stir occasionally until no longer pink, about another five minutes. Now pour in your jar of marinara sauce and 1/2 cup chicken stock. Bring to a boil, then reduce heat to low, and let simmer for about 15 minutes.

4) Add your cooked and drained pasta to the sauce, making sure to incorporate it well. Serve on individual plates or in pasta bowls, and top with grated pecorino romano cheese and chopped fresh parsley.


Enjoy! 

SaveSave
SaveSaveSaveSave

food crush

Friday, January 27, 2017

 I believe anything fruitful begins with a solid foundation, and when preparing food, there’s certainly no exception. Though for many years, I never thought twice about cooking with a store bought carton of chicken stock. Then one day I had a need to use my own broth (I think my hubby had a nasty bug or something), and let me proclaim, that was the day when all of my faithful home recipes (like chili, spaghetti, ramen, shrimp creole, to name a few…) went from lukewarm to on fire! So when you’re ready to light your kitchen skills up a notch, make your own today. It’s easy, cozy, and totally worth your while! 💛 -Jess xoxo

Homemade chicken stock


makes 4 quarts or 1 gallon
INGREDIENTS:


1 whole or cut up chicken

4 quarts water

1 tablespoon raw apple cider vinegar

4 medium sized onions, chopped in quarters, skins on

8 carrots, unpeeled & coarsely chopped

6 celery stalks, coarsely chopped

5-6 garlic cloves, skins on is fine here too

4 inches of coarsely chopped ginger(optional)

4-6 tablespoons extra virgin coconut oil or butter

4 tablespoons sea salt

1 bunch parsley


PREPARATION:

1) If using a whole chicken, remove and discard the fat glands and gizzards from the cavity.
Place chicken or chicken pieces and all other ingredients, except parsley, in a large stainless steel pot. Bring to a boil, and remove scum that rises to the top. Cover and reduce the heat to low. Cook  stock for 12-24 hours. ( I usually cook mine for about 18 hours. The longer you cook it, the more  rich and flavorful it will be!)

2) About five minutes before finishing the stock, add parsley. Remove from heat, and take the chicken out of pot. Set aside chicken to cool for now. Strain all the vegetables.

3)After the chicken has cool down, remove meat from the carcass, and reserve for other uses (like making chicken tacos, barbeque sandwiches, salads, or wraps).

4) Store broth in lidded glass jars in your refrigerator, or in quart sized plastic bags saved in the freezer for future use.


food crush

Tuesday, January 10, 2017


 Creating something beautiful and tidy for a crowd doesn't always mean spending hours prepping, cooking, and cleaning in the kitchen, especially when you whip up this lovely salmon recipe!

Oven-Roasted Parmesan Panko Crusted Salmon


serves 8
INGREDIENTS:

1 cup panko breadcrumbs

4 tablespoons butter, melted

2 teaspoons minced garlic

1/4 cup grated parmesan, plus a little extra for sprinkling on salmon

1 tablespoon chopped fresh dill

1 teaspoon red pepper flakes

1 (3-4 pound) side of salmon, skin on

2 tablespoons olive oil

salt & pepper to taste

fresh lemon for serving


PREPARATION:

1) Preheat oven to 450 degrees. Mix bread crumbs, 2 tablespoons melted butter, minced garlic, 1/4 cup grated parmesan, and 1/2 teaspoon salt together in a medium bowl. Set aside for now.

2)  Cover a large shallow roasting pan with aluminum foil. Drizzle with olive oil. Place salmon in pan skin side up at first. Liberally salt and pepper the skin. Flip over. Brush the other side with the rest of melted butter, and again liberally season with salt and pepper.

3) Now cover salmon with your bread crumb mixture. Sprinkle with red pepper flakes, chopped fresh dill, and extra parmesan. Roast in the oven for about 20 minutes, or until all but the very  center of fish has turned from translucent to opaque and your breads crumbs are nicely browned. Serve with lemon wedges!


cozy journey

Monday, January 9, 2017

Is it wine o'clock yet?....
                  
 It wasn’t that long ago when sipping on a cool, celebratory glass of wine (for a day well done and a tasty dinner in the making) was my much anticipated, late afternoon ritual. After all, I saw it as a well deserved treat that symbolized something synonymous with being cozy, and yes, more often than not, that seemingly luxurious libation did have that comfy effect on me! So naturally, my little habit of choice offered both the relaxation I craved and a loyal escape from life’s little madnesses.

 However, I’m not sure when one glass graduated to several by the end of most evenings or at what exact moment trying to relax felt impossible without it, though I do know it was no longer a leisure of choice, but more like an innate mode of survival.

 Ok, at this point you may be nodding your head in complete & compassionate understanding or (dare I say) be whispering something  more like “alcoholic” in your disapproving mind. I get it. Honestly I wasn’t sure how I felt about it anymore either. I mean, an end of the day tipple did feel like the perfect way to round out repetitive days of chores and mad kid rushed, homework filled, dinner making afternoons, but did I really need to depend on sipping vino everyday to feel snug at night?

 It took a minute(more like 6 years or so), but my heart and slowly expanding waistline yearned for an improvement. That was when I decided to give wine- free weeknights a shot. (scary, I know!) While the first three nights separated from vino in hand felt more like a shaky breakup, I did manage to pull myself together and press on. 

 Fast forward three and a half months. I’m now eight pounds lighter, my stomach is flatter, my face looks and feels more hydrated in the morning, and most noteworthily, I’ve rediscovered what it’s like to not feel deprived without my favorite five o’clock baby in hand. 


 Of course, I’m not saying indulging in a glass of red or white is bad for you or that it’s out of my life for good( I love wine!). I just know I had created an unhealthy habit for myself, which is why it was time to let go and learn to savor a new kind of bold, yet refined independence! 💛 -jess xoxo
 photo envye.jpg
envye blogger theme